1. Engineering Structures
and Materials
1.1
Introduction
Mechanics of materials is a branch of applied mechanics that deals with
the behavior of solid bodies subjected to various types of loading. This field of study is
known by several names, including "Strength of materials" and "mechanics of
deformable bodies." The solid bodies considered in this book include axially loaded
members, shafts in torsion, thin shells, beams, and columns, as well as structures that
are assemblies of these components. Usually the objectives of our analysis will be the
determination of the stresses, strains, and deflections produced by the loads. If these
quantities can be found for all values of load up to the failure load, then we will have a
complete picture of the mechanical behavior of the body.
A thorough understanding of mechanical behavior is essential for the
safe design of all structures, whether buildings and bridges, machines and motors,
submarines and ships, or airplanes and antennas. Hence, mechanics of materials is a basic
subject in many engineering fields. Of course, statics and dynamics are also essential,
but they deal primarily with the forces and motions associated with particles and rigid
bodies. In mechanics of materials, we go one step further by examining the stresses and
strains that occur inside real bodies that deform under loads. We use the physical
properties of the materials (obtained from experiments) as well as numerous theoretical
laws and concepts, which are explained in succeeding sections of this book.
Theoretical analyses and experimental results have equally important
roles in the study of mechanics of materials. On many occasions, we will make logical
derivations to obtain formulas and equations for predicting mechanical behavior, but we
must recognize that these formulas cannot be used in a realistic way unless certain
properties of the materials are known. These properties are available to us only after
suitable experiments have been carried out in the laboratory. Also, because many practical
problems of great importance in engineering cannot be handled efficiently by theoretical
means, experimental measurements become a necessity.
The historical development of mechanics of materials is a fascinating
blend of both theory and experiment; experiments have pointed the way to useful results in
some instances, and theory has done so in others. Such famous men as Leonardo da Vinci
(1452-1519) and Galileo Galilei (1564-1642) performed experiments to determine the
strength of wires, bars, and beams, although they did not develop any adequate theories
(by today's standards) to explain their test results. Such theories came much later. By
contrast, the famous mathematician Leonhard Euler (1707-1783) developed the mathematical
theory of columns and calculated the theoretical critical load of a column in 1744, long
before any experimental evidence existed to show the significance of his results. Thus,
for want of appropriate tests, Euler's results remained unused for many years, although
today they form the basis of column theory.
When studying mechanics of materials from this book, you will find that
your efforts are divided naturally into two parts: first, understanding the logical
development of the concepts, and second, applying those concepts to practical situations.
The former is accomplished by studying the derivations, discussions, and examples, and the
latter by solving problems. Some of the examples and problems are numerical in character,
and others are algebraic or symbolic). An advantage of numerical problems is that the
magnitudes of all quantities are evident at every stage of the calculations. Sometimes
these values are needed to ensure that practical limits (such as allowable stresses) are
not exceeded. Algebraic solutions have certain advantages, too. Because they lead to
formulas, algebraic solutions make clear the variables that affect the final result. For
instance, a certain quantity may actually cancel out of the solution, a fact that would
not be evident from a numerical problem. Also apparent in algebraic solutions is the
manner in which variables affect the results, such as the appearance of one variable in
the numerator and another in the denominator. Furthermore, a symbolic solution provides
the opportunity to check the dimensions at any stage of the work. Finally, the most
important reason for obtaining an algebraic solution is to obtain a general formula that
can be programmed on a computer and used for many different problems. In contrast, a
numerical solution applies to only one set of circumstances. Of course, you must be adept
at both kinds of solutions, hence you will find a mixture of numerical and algebraic
problems throughout the book.
Numerical problems require that you work with specific units of
measurements. The two accepted standards of measurement are the. International System of
Units (SI) and the U.S. Customary System (USCS). As you know significant digits are very
important in engineering. In our work in this section, three significant digits provides
enough accuracy.
1.2
Normal Stress and Strain
The fundamental concepts of stress and strain can be illustrated by
considering a prismatic bar that is loaded by axial forces P at the ends, as shown in
Figure 1. A prismatic bar is a straight structural member having constant cross section
throughout its length. In this illustration, the axial forces produce a uniform stretching
of the bar; hence, the bar is said to be in tension.
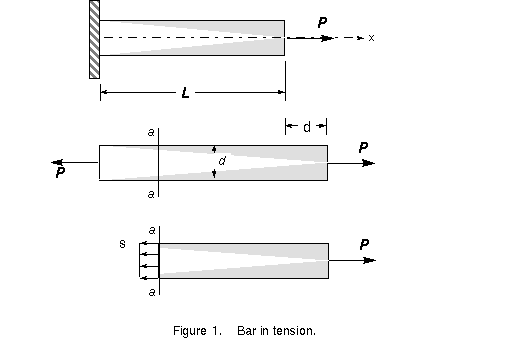
To investigate the internal stresses produced in the bar by the axial
forces, we make an imaginary cut at section aa (Figure 1). This section is taken
perpendicular to the longitudinal axis of the bar; hence, it is known as a cross section.
We now isolate the part of the bar to the right of the cut as a free body. The tensile
load P acts at the righthand end of the free body; at the other end are forces
representing the action of the removed part of the bar upon the part that remains. These
forces are continuously distributed over the cross section, analogous to the continuous
distribution of hydrostatic pressure over a submerged horizontal surface. The intensity of
force (that is, the force per unit area) is called the stress and is commonly denoted by
the Greek letter s (sigma). Assuming that the stress has a uniform distribution over the
cross section (see Figure 1), we can readily see that its resultant is equal to the
intensity s times the cross-sectional area A of the bar. Furthermore, from the equilibrium
(balancing of forces) of the body shown in Figure 1, it is also evident that this
resultant must be equal in magnitude and opposite in direction to the applied load P.
Hence, we obtain
 (1) (1)
as the equation for the uniform stress in an axially loaded, prismatic
bar of arbitrary cross-sectional shape. When the bar is stretched by the forces P, as
shown in the figure, the resulting stresses are tensile stresses; if the forces are
reversed in direction, causing the bar to be compressed, we obtain compressive stresses.
Inasmuch as the stress a acts in a direction perpendicular to the cut surface, it is
referred to as a normal stress. Thus, normal stresses may be either tensile or compressive
stresses. Later, we will encounter another type of stress, called a shear stress, that
acts parallel to the surface.
When a sign convention for normal stresses is required, it is customary
to define tensile stresses as positive (+) and compressive stresses as negative (-).
Because the normal stress s is obtained by dividing the axial force by
the cross-sectional area, it has units of force per unit of area. When SI units are used,
force is expressed in newtons (N) and area in square meters (m2). Hence, stress has units
of newtons per square meter (N/m2), or pascals (Pa). However, the pascal is such a small
unit of stress that it is necessary to work with large multiples. To illustrate this
point, we have only to note that it takes almost 7000 pascals to make 1 psi.
As an example, a typical tensile stress in a steel bar might have a
magnitude of 140 megapascals (140 MPa), which is 140 x 106 pascals. Other units that may
be convenient to use are the kilopascal (kPa) and gigapascal (GPa); the former equals 103
pascals and the latter equals 109 pascals. Although it is not recommended in SI, you will
sometimes find stress given in newtons per square millimeter (N/mm2), which is a unit
identical to the megapascal (MPa).
When using USCS units, stress is customarily expressed in pounds per
square inch (psi) or kips per square inch (ksi). One kip, or kilopound, equals 1000
pounds. For instance, a typical stress in a steel bar might be 20,000 psi or 20 ksi.
In order for the equation s = P/A to be valid, the stress s must be
uniformly distributed over the cross section of the bar. This condition is realized if the
axial force P acts through the centroid of the cross-sectional area. When the load P does
not act at the centroid, bending of the bar will result, and a more complicated analysis
is necessary (you will learn more in CIVL 3322 Strength of Materials). However, we will
assume throughout our discussions that all axial forces are applied at the centroid of the
cross section unless specifically stated otherwise.
The uniform stress condition pictured in Figure 1 exists throughout the
length of the member except near the ends. The stress distribution at the ends of the bar
depends upon the details of how the axial load P is actually applied. If the load itself
is distributed uniformly over the end, then the stress pattern at the end will be the same
as elsewhere. However, the load is usually concentrated over a small area, resulting in
high localized stresses and nonuniform stress distributions over cross sections in the
vicinity of the load. As we move away from the ends, the stress distribution gradually
approaches the uniform distribution.
It is usually safe to assume that the formula s = P/A may be used with
good accuracy at any point within the bar that is at least a distance d away from the
ends, where d is the largest transverse dimension of the bar (see Figure 1). Of course,
even when the stress is not uniform, the equation s = P/A will give the average normal
stress.
An axially loaded bar undergoes a change in length, becoming longer
when in tension and shorter when in compression. The total change in length is denoted by
the Greek letter d (delta) and is pictured in Figure 1 for a bar in tension. This
elongation is the cumulative result of the stretching of the material throughout the
length L of the bar. Let us now assume that the material is the same everywhere in the
bar. Then, if we consider half of the bar, it will have an elongation equal to d/2;
similarly, if we consider a unit length of the bar, elongation equal to 1/L times the
total elongation d. In this manner, we arrive at the concept of elongation per unit
length, or strain, denoted by the Greek letter e (epsilon) and given by the equation
 (2) (2)
If the bar is in tension, the strain is called a tensile strain,
representing an elongation or stretching of the material. If the bar is in compression,
the strain is a compressive strain and the bar shortens. Tensile strain is taken as
positive (+), and compressive strain as negative (-). The strain e is called a normal
strain because it is associated with normal stresses.
Because normal strain e is the ratio of two lengths, it is a
dimensionless quantity; that is, it has no units. Thus, strain is expressed as a pure
number, independent of any system of units. Numerical values of strain are usually very
small, especially for structural materials, which ordinarily undergo only small changes in
dimensions.
As an example, consider a steel bar having length L of 2.0 m. When
loaded in tension, the bar might elongate by an amount d equal to 1.4 mm. The
corresponding strain is

In practice, the original units of d and L are sometimes attached to
the strain itself, and then the strain is recorded in forms such as mm/m, mm/m, and
in./in. For instance, the strain e in the preceding illustration could be given as 700
mm/m or 700 x 10-6 in,/in.
The definitions of normal stress and strain are based upon purely
statical and geometrical considerations, hence Equations 1 and 2 can be used for loads of
any magnitude and for any material. The principal requirement is that the deformation of
the bar be uniform, which in turn requires that the bar be prismatic, the loads act
through the centroids of the cross sections, and the material be homogeneous (that is, the
same throughout all parts of the bar).
The resulting state of stress and strain is called uniaxial stress and
strain. Further discussions of uniaxial stress, including stresses and strains in other
than the longitudinal direction of the bar, are given in later sections. We will also
encounter more complicated stress states, such as biaxial stress and plane stress, in
later chapters.
Example - A prismatic bar with a circular cross
section is subjected to an axial tensile force. The measured elongation is d = 1.5 mm.
Calculate the tensile stress and strain in the bar.

Assuming the axial force act at the centroid of the end cross section,
then the stress is

The strain is

1.3
Stress-Strain Diagrams
The mechanical properties of materials used in engineering are
determined by tests performed on small specimens of the material. The tests are conducted
in materials-testing laboratories equipped with testing machines capable of loading the
specimens in a variety of ways, including static and dynamic loading in tension and
compression.
In order that test results may be compared easily, the dimensions of
test specimens and the methods of applying loads have been standardized. One of the major
standards organizations is the American Society for Testing and Materials (ASTM), a
national technical society that publishes specifications and standards for materials and
testing. Other standardizing organizations are the American Standards Association (ASA)
and the National Bureau of Standards (NBS).
The most common materials test is the tension test, in which tensile
loads are applied to a cylindrical specimen. The ends of the specimen are enlarged where
they fit in the grips so that failure will occur in the central uniform region, where the
stress is easy to calculate, rather than near the ends, where the stress distribution is
complicated. An extensometer is used to measures the elongation during loading.
The ASTM standard tension specimen has a diameter of 0.5 in. and a gage
length of 2.0 in. between the gage marks, which are the points where the extensometer arms
are attached to the specimen. As the specimen is pulled, the load P is measured and
recorded, either automatically or by reading from a dial. The elongation over the gage
length is measured simultaneously with the load, usually by mechanical gages, although
electric-resistance strain gages are also used. In a static test, the load is applied very
slowly; however, in a dynamic test, the rate of loading may be very high and also must be
measured because it affects the properties of the materials.
The axial stress s in the test specimen is calculated by dividing the
load P by the cross-sectional area A (see Equation (1)). When the initial area of the bar
is used in this calculation, the resulting stress is called the nominal stress (other
names are conventional stress and engineering stress). A more exact value of the axial
stress, known as the true stress, can be calculated by using the actual area of the bar,
which can become significantly less than the initial area for some materials.
The average axial strain in the bar is found from the measured
elongation d between the gage marks by dividing d by the gage length L, Equation (2). If
the initial gage length is used (for instance, 2.0 in.), then the nominal strain is
obtained. Of course, the distance between the gage marks increases as the tensile load is
applied. If the actual distance is used in calculating the strain, we obtain the true
strain, or natural strain.
Compression tests of metals are customarily made on small specimens in
the shape of cubes or circular cylinders. Cubes are often 2.0 in. on a side, and cylinders
usually have diameters of about 1 in. with lengths of 1 to 12 in. Both the load applied by
the machine and the shortening of the specimen may be measured. The shortening should be
measured over a gage length that is less than the total length of the specimen in order to
eliminate end effects.
Concrete is tested in compression on every important construction
project to ensure that the required strengths have been obtained. The standard ASTM
concrete test specimen is 6 in. in diameter, 12 in. long, and 28 days old (the age of
concrete is important because concrete gains strength as it cures).
After performing a tension or compression test and determining the
stress and strain at various magnitudes of the load, we can plot a diagram of stress
versus strain. Such a stress-strain diagram is characteristic of the material and conveys
important information about the mechanical properties and type of behavior. Stress-strain
diagrams were originated by Jacob Bernoulli (1654-1705) and J. V. Poncelet (1788-1867).
The first material we will discuss is structural steel, also known as
mild steel or low-carbon steel. Structural steel is one of the most widely used metals,
being the principal steel used in buildings, bridges, towers, and many other types of
construction. A stress-strain diagram for a typical structural steel in tension is shown
in Figure 2 (not to scale).
Strains are plotted on the horizontal axis and stresses on the vertical
axis. The diagram begins with a straight line from O to A. In this region, the stress and
strain are directly proportional, and the behavior of the material is said to be linear.
Beyond point A, the linear relationship between stress and strain no longer exists; hence,
the stress at A is called the proportional limit. For low-carbon steels, this limit is in
the range 30 to 40 ksi, but high-strength steels (with higher carbon content plus other
alloys) can have proportional limits of 80 ksi and more.
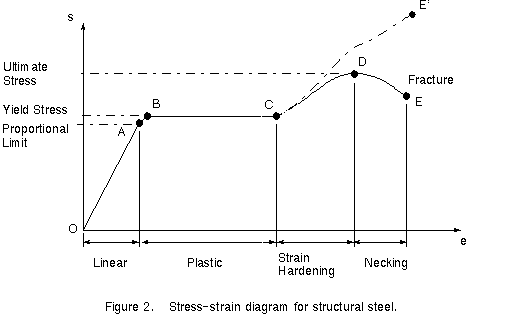
With an increase in the load beyond the proportional limit, the strain
begins to increase more rapidly for each increment in stress. The stress-strain curve then
has a smaller and smaller slope, until, at point B, the curve becomes horizontal.
Beginning at this point, considerable elongation occurs, with no noticeable increase in
the tensile force (from B to C on the diagram). This phenomenon is known as yielding of
the material, and the stress at point B is called the yield stress, or yield point. In the
region from B to C, the material becomes perfectly plastic, which means that it can deform
without an increase in the applied load. The elongation of a mild-steel specimen in the
perfectly plastic region is typically 10 to 15 times the elongation that occurs between
the onset of loading and the proportional limit.
After undergoing the large strains that occur during yielding in the
region BC, the steel begins to strain harden. During strain hardening, the material
undergoes changes in its atomic and crystalline structure, resulting in increased
resistance of the material to further deformation. Thus, additional elongation requires an
increase in the tensile load, and the stress-strain diagram has a positive slope from C to
D The load eventually reaches its maximum value, and the corresponding stress tat point D)
is called the ultimate stress. Further stretching of the bar is actually accompanied by a
reduction in the load, and fracture finally occurs at a point such as E on
the diagram.
Lateral contraction of the specimen occurs when it is stretched,
resulting in a decrease in the cross-sectional area, as previously mentioned. The
reduction in area is too small to have a noticeable effect on the calculated value of
stress up to about point C, but beyond that point the reduction begins to alter the shape
of the diagram. Of course, the true stress is larger than the nominal stress because it is
calculated with a smaller area.
In the vicinity of the ultimate stress, the reduction in area of the
bar becomes clearly visible and a pronounced necking of the bar occurs. If the actual
cross-sectional area at the narrow part of the neck is used to calculate the stress, the
true stress-strain curve will follow the dashed line CE' in Figure 2. The total load the
bar can carry does indeed diminish after the ultimate stress is reached (curve DE), but
this reduction is due to the decrease in area of the bar and not to a loss in strength of
the material itself.
In reality, the material withstands an increase in stress up to failure (point E'). For
most practical purposes, however, the conventional stress-strain curve OABCDE, which is
based upon the original cross-sectional area of the specimen and hence is easy to
calculate, provides satisfactory information for use in design.
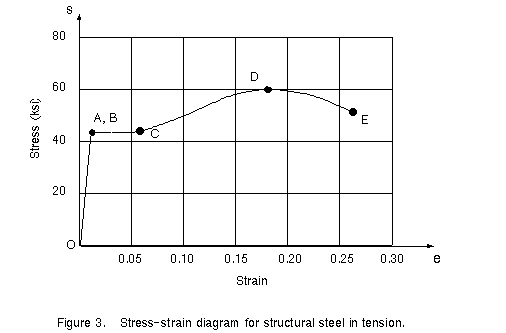
The diagram in Figure 2 shows the general characteristics of the
stress-strain curve for mild steel, but its proportions are not realistic because, as
already mentioned, the strain that occurs from B to C may be 15 times the strain occurring
from O to A. Furthermore, the strains from C to E are many times greater than those from B
to C. Figure 3 shows a stress-strain diagram for mild steel drawn approximately to scale.
In this figure, the strains from O to A are so small in comparison to the strains from A
to E that they cannot be seen, and the linear part of the diagram appears to be a vertical
line.
The presence of a pronounced yield point followed by large plastic strains is an
important characteristic of mild steel that is sometimes utilized in practical design.
Materials that undergo large strains before failure are classified as ductile. An
advantage of ductility is that visible distortions may occur if the loads become too
large, thus providing an opportunity to take remedial action before an actual fracture
occurs. Also, ductile materials are capable of absorbing large amounts of energy prior to
fracture. Ductile materials include mild steel, aluminum and some of its alloys, copper,
magnesium, lead, molybdenum, nickel, brass, bronze, monel metal, nylon, teflon, and many
others.
Structural steel contains about 0.2% carbon as an alloy and is classified as a
low-carbon steel. With increasing carbon content, steel becomes less ductile but has a
higher yield stress and higher ultimate stress. The physical properties of steel are also
affected by heat treating, the presence of other alloys, and manufacturing processes such
as rolling.
Many aluminum alloys possess considerable ductility, although they do not
have a clearly definable yield point. Instead, they exhibit a gradual transition from the
linear to the nonlinear region, as shown by the stress-strain diagram in Figure 4.
Aluminum alloys suitable for structural purposes are available with proportional limits in
the range 10 to 60 ksi and ultimate stresses in the range 20 to 80 ksi.
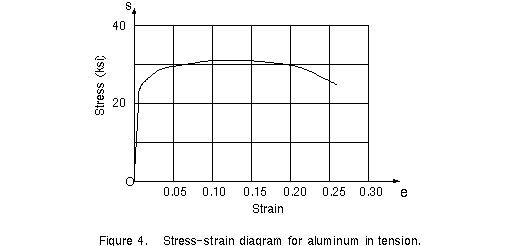
When a material such as aluminum does not have an obvious yield point and yet undergoes
large strains after the proportional limit is exceeded, an arbitrary yield stress may be
determined by the offset method. A line is drawn on the stress-strain diagram parallel to
the initial linear part of the curve but is offset by some standard amount of strain, such
as 0.002 or 0.2%). The intersection of the offset line and the stress-strain curve (point
A in the figure) defines the yield stress.
Since this stress is determined by an arbitrary rule and is not an inherent physical
property of the material, it should be referred to as the offset yield stress. For a
material such as aluminum, the offset yield stress is slightly above the proportional
limit. In the case of structural steel, with its abrupt transition from the linear region
to the region of plastic stretching, the offset stress is essentially the same as both the
yield stress and the proportional limit.
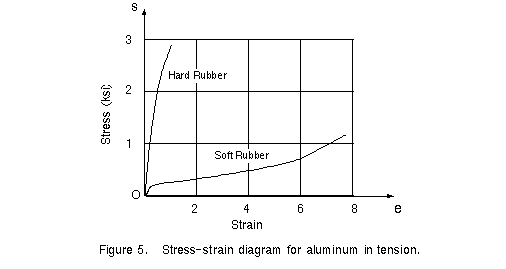
Rubber maintains a linear relationship between stress and strain up to very large
strains in the vicinity of 0.1 or 0.2. The behavior after the proportional limit is
exceeded depends upon the type of rubber (see Figure 5). Some kinds of soft rubber
continue to stretch enormously without failure. The material eventually offers increasing
resistance to the load, and the stress-strain curve turns markedly upward prior to
failure. You can easily sense this characteristic behavior by stretching a rubber band.
The ductility of a material in tension can be characterized by its elongation and by
the reduction in area at the cross section where fracture occurs. The percent elongation
is defined as follows:
 (3) (3)
in which L0 is the original gage length and Lf
is the distance between the gage marks at fracture. Because the elongation is not uniform
over the length of the specimen but is concentrated in the region of necking, the percent
elongation depends upon the gage length. Therefore, when stating the percent elongation,
the gage length should also be given. For a 2 in. gage length, steel may have an
elongation in the range of 10% to 40%, depending upon composition; for structural steel,
values of 25% or 30% are common. In the case of aluminum alloys, the elongation varies
from 1% to 45%, depending upon composition and treatment.
The percent reduction in area measures the amount of necking that occurs and is defined
as follows:
 (4) (4)
in which Ao, is the original cross-sectional area and Af,
is the final area at the fracture section. For ductile steels, the reduction is about 50%.
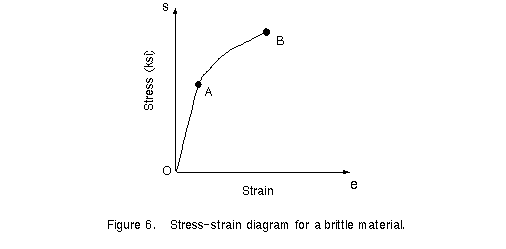
Materials that fail in tension at relatively low values of strain are classified as
brittle materials. Examples are concrete, stone, cast iron, glass, ceramic materials, and
many common metallic alloys. These materials fail with only little elongation after the
proportional limit (point A in Figure 6) is exceeded, and the fracture stress (point B) is
the same as the ultimate stress. High-carbon steels behave in a brittle manner; they may
have a very high yield stress (over 100 ksi in some cases), but fracture occurs at an
elongation of only a few percent.
Ordinary glass is a nearly ideal brittle material, because it exhibits almost no
ductility whatsoever. The stress-strain curve for glass in tension is essentially a
straight line, with failure occurring before any yielding takes place. The ultimate stress
is about 10,000 psi for certain kinds of plate glass, but great variation exists,
depending upon the type of glass, size of specimen, and the presence of microscopic
defects. Glass fibers can develop enormous strengths, and ultimate stresses over 1,000 ksi
have been attained.
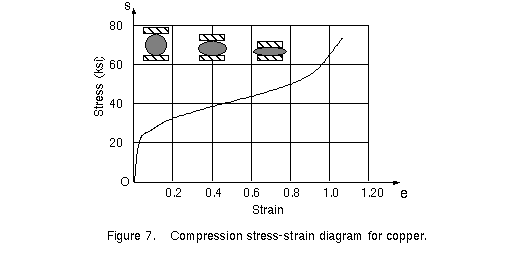
Stress-strain diagrams for compression have different shapes from those for tension.
Ductile metals such as steel, aluminum, and copper have proportional limits in compression
very close to those in tension, hence the initial regions of their compression
stress-strain diagrams are very similar to the tension diagrams. However, when yielding
begins, the behavior is quite different. In a tension test, the specimen is being
stretched, necking may occur, and ultimately fracture takes place. When a small specimen
of ductile material is compressed, it begins to bulge outward on the sides and become
barrel shaped. With increasing load, the specimen is flattened out, thus offering
increased resistance to further shortening (which means the stress-strain curve goes
upward). These characteristics are illustrated in Figure 7, which shows a compression
stress-strain diagram for copper.
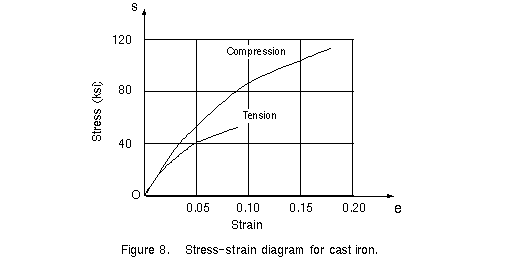
Brittle materials in compression typically have an initial linear region followed by a
region in which the shortening increases at a higher rate than does the load. Thus, the
compression stress-strain diagram has a shape that is similar to the shape of the tensile
diagram. However, brittle materials usually reach much higher ultimate stresses in
compression than in tension. Also, unlike ductile materials in compression (see Figure 6),
brittle materials actually fracture or break at the maximum load. The tension and
compression stress-strain diagrams for a particular type of cast iron are given in Figure
8. Curves for other brittle materials, such as concrete and stone, have similar shapes but
quite different numerical values.
A table of important mechanical properties for various materials can be found in most
Strength of Materials textbooks. However, properties and stress-strain curves vary
greatly, even for the same material, because of different manufacturing processes,
chemical composition, internal defects, temperature, and many other factors. Hence, any
data obtained from general tables should be considered as typical, but not necessarily
suitable for a specific application.
1.4 Elasticity and
Plasticity
The stress-strain diagrams described in the preceding section illustrate the behavior
of various materials as they are loaded statically in tension or compression. Now let us
consider what happens when the load is slowly removed, and the material is unloaded.
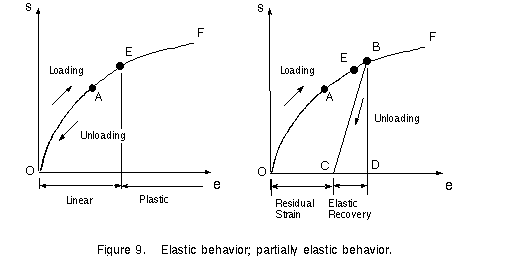
Assume, for instance, that we apply a load to a tensile specimen so that the stress and
strain go from O to A on the stress-strain curve in Figure 9. Suppose further that, when
the load is removed, the material follows exactly the same curve back to the origin O.
This property of a material, by which it returns to its original dimensions during
unloading, is called elasticity, and the material itself is said to be elastic. Note that
the stress-strain curve from O to A need not be linear in order for the material to be
elastic
Now let us suppose that we load this same material to a much higher level, so that
point B is reached on the stress-strain diagram, see Figure 9. In this case, when
unloading occurs, the material follows line BC on the diagram. This unloading line
typically is parallel to the initial portion of the loading curve; that is line BC is
parallel to a tangent to the stress-strain curve at O. When point C is reached, the load
has been entirely removed, but a residual strain, or permanent strain, OC remains in the
material. The corresponding residual elongation of the bar is called the permanent set. Of
the total strain OD developed during loading from O to B, the strain CD has been recovered
elastically and the strain OC remains as a permanent strain. Thus, during unloading the
bar returns partially to its original shape; hence, the material is said to be partially
elastic.
When a bar is being tested, the load can be increased from zero to some small selected
value and then removed. If there is no permanent set (that is, if the elongation of the
bar returns to zero) then the material is elastic up to the stress represented by the
selected value of the load. This process of loading and unloading can be repeated for
successively higher values of load. Eventually, a stress will be reached such that not all
the strain is recovered during unloading. By this procedure, it is possible to determine
the stress at the upper limit of the elastic region; for instance, it could be the stress
at point E in Figure 9. This stress is known as the elastic limit of the material.
Many materials, including most metals, have linear regions at the beginning of their
stress-strain curves (see Figures 2 and 4). As explained in a previous section, the upper
limit of this linear region is defined by the proportional limit. Usually the elastic
limit is slightly above, or nearly the same as, the proportional limit. Hence, for many
materials the two limits are assigned the same numerical value. In the case of mild steel,
the yield stress is also very close to the proportional limit, so that for practical
purposes the yield stress, the elastic limit, and the proportional limit are assumed to be
equal. Of course, this situation does not hold for all materials. Rubber provides the
outstanding example of a material that is elastic far beyond the proportional limit.
The characteristic of a material by which it undergoes inelastic strains beyond those
at the elastic limit is known as plasticity. Thus, on the stress-strain curve in Figure 9,
we have an elastic region followed by a plastic region. When large deformations occur in a
ductile material loaded into the plastic region, the material is said to undergo plastic
flow.
If the material remains within the elastic range, it can be loaded, unloaded, and
loaded again without significantly changing the behavior. However, when loaded into the
plastic range, the internal structure of the material is altered and its properties
change. For instance, we have already observed that a permanent strain exists in the
specimen after unloading from the plastic region (Figure 9).
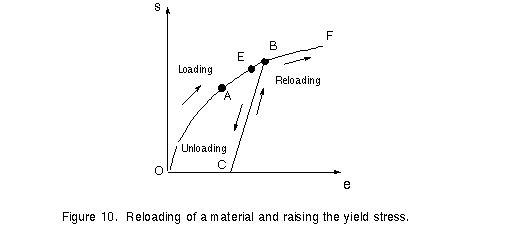
Now suppose that the material is reloaded after such an unloading (Figure 10). The new
loading begins at point C on the diagram and continues upward to B, the point at which
unloading began during the first loading cycle. The material then follows the original
stress-strain diagram toward point F. During the second loading, the material behaves in a
linear manner from C to B, hence the material has a higher proportional limit and a higher
yield stress than before. Thus, by stretching a material, it is possible to raise the
yield point, although the ductility is reduced because the amount of yielding from B to F
is less than from E to F.
The stress-strain diagrams previously described are obtained from tension tests
involving only static loading of the specimens; hence, the passage of time did not enter
into our discussions. However, some materials develop additional strains over long periods
of time and are said to creep. This phenomenon can manifest itself in a variety of ways.
For instance, let us suppose that a vertical bar (Figure 11) is loaded by a constant force
P. When the load is applied initially, the bar elongates by an amount d0. Let us assume
that this loading and the corresponding elongation take place during a time interval of
duration t0. Subsequent to time t0, the load remains constant. However, due to creep, the
bar may gradually lengthen, as shown in Figure 11, even though the load does not change.
This behavior occurs with many materials, although sometimes the change is too small to be
of concern.

As a second example of creep, consider a wire that is stretched between two immovable
supports so that it has an initial tension stress s0,
(Figure 12). Again, we will denote the time during which the wire is loaded initially as t0
(Figure 12). With the elapse of time, the stress in the wire gradually diminishes,
eventually reaching a constant value, even though the supports at the ends of the wire do
not move. This process, which is a manifestation of creep, is called relaxation of the
material.

Creep is usually more important at high temperatures than at ordinary temperatures;
hence, it must be considered in the design of engines, furnaces, and other structures that
operate at elevated temperatures for long periods of time. However, materials such as
steel, concrete, and wood creep slightly even at atmospheric temperatures. Therefore, it
is sometimes necessary to compensate for creep effects in ordinary structures.
For example, creep of concrete can create "waves" in bridge decks because of
sagging between the supports. One remedy is to construct the deck with an upward camber,
which is an initial deflection above the horizontal, so that, when creep occurs, the spans
lower to the level position.
1.5 Linear Elasticity and
Hooke's Law
Most structural materials have an initial region on the stress-strain diagram in which
the material behaves both elastically and linearly. An example is the region from the
origin O up to the proportional limit at point A on the stress-strain curve for structural
steel (see Figure 2). Other examples are the regions below both the proportional limits
and the elastic limits on the diagrams of Figures 4 through 8. When a material behaves
elastically and also exhibits a linear relationship between stress and strain, it is said
to be linearly elastic. This type of behavior is extremely important in engineering
because many structures and machines are designed to function at low levels of stress in
order to avoid permanent deformations from yielding or plastic flow. Linear elasticity is
a property of many solid materials, including metals, wood, concrete, plastics, and
ceramics.
The linear relationship between stress and strain for a bar in simple tension or
compression can be expressed by the equation
 (5) (5)
in which E is a constant of proportionality known as the
modulus of elasticity for the material. The modulus of elasticity is the slope of the
stress-strain diagram in the linearly elastic region, and its value depends upon the
particular material being used. The units of E are the same as
the units of stress, inasmuch as strain is dimensionless. Hence, the units of E
are psi or ksi in USCS units and pascals in SI units.
The equation  commonly known as Hooke's law, for the famous English
scientist Robert Hooke (1635-1703). Hooke was the first person to investigate the elastic
properties of materials, and he tested such diverse materials as metal, wood, stone,
bones, and sinews. He measured the stretching of long wires supporting weights and
observed that the elongations "always bear the same proportions one to the other that
the weights do that make them." Thus, Hooke established the linear relationship
between the applied load and the resulting elongation. commonly known as Hooke's law, for the famous English
scientist Robert Hooke (1635-1703). Hooke was the first person to investigate the elastic
properties of materials, and he tested such diverse materials as metal, wood, stone,
bones, and sinews. He measured the stretching of long wires supporting weights and
observed that the elongations "always bear the same proportions one to the other that
the weights do that make them." Thus, Hooke established the linear relationship
between the applied load and the resulting elongation.
Equation (5) applies only to ordinary tension and compression; for more complicated
states of stress, a generalized Hooke's law is required. In calculations, tensile stress
and strain are usually considered as positive, and compressive stress and strain as
negative.
The modulus of elasticity E has relatively large values for materials that are very
stiff, such as structural metals. Steel has a modulus of approximately 30,000 ksi or 200
GPa; for aluminum, E equals approximately 10,600ksi or 70 GPa.
More flexible materials have a lower modulus; a typical value for wood is 1,600 ksi or 11
GPa. Representative values of E are typically listed in most
Strength of Materials textbooks. For most materials, the value of E in
compression is the same as in tension.
The modulus of elasticity is often called Youug's modulus, after another English
scientist, Thomas Young (1773-1829). In connection with an investigation of tension and
compression of prismatic bars, Young introduced the idea of a "modulus of the
elasticity." However, his modulus was not the same as the one in use today, because
it involved properties of the bar as well as of the material.
|


